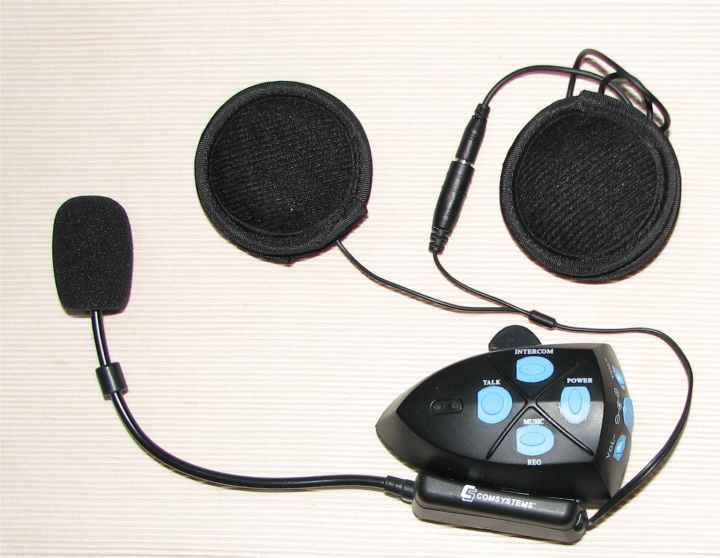
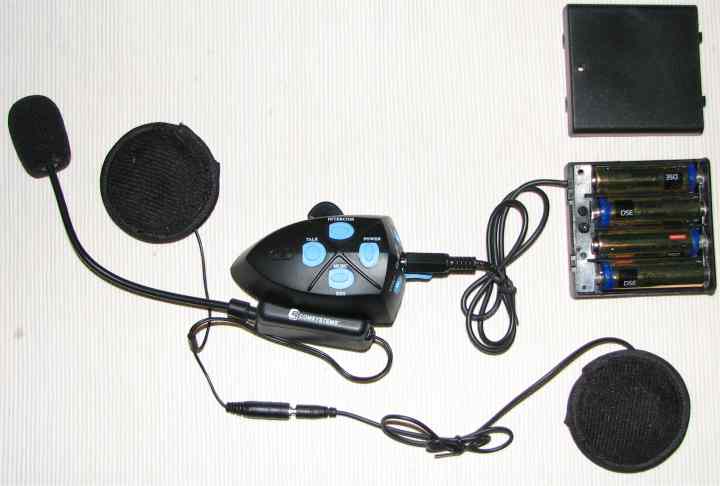
one helmet unit with two speakers (two supplied) headset velcroed to side of helmet
Wireless rider Pillion unit ( not bluetooth) NO longer sold but information left here for websurfers who may have purchased on somewhere
The Rider to pillion unit is not bluetooth but 2.4 Ghz digital audio based on the scandanavian Nordic RF chipset NRF4201A . It has a control box mounted at the users reach for control of the functions , I placed mine on the tank with velcro ( love that stuff) the interface unit is so you can interface your cellphone and MP3 player , you can "pair" a second headset to the first one via the control module and this achieve wireless rider pillion speech , music or cellphone . The maximum number is 2 headsets and a base Like all "miniature" digital radio systems ,you will only get 4-5 Hrs maximum talk time from the system before having to recharge , However we are trying and outboard power pack that plugs into the charging port to extend the operation time to the 10-15 Hrs timeframe ! .
the Motocom has audio DSP technology and will automatically adjust microphone gains to suit the ambient noise levels in and around the helmet thus optimising the communications effectiveness at different riding speeds !
one helmet unit with two
speakers (two supplied)
headset velcroed to side of helmet
Wireless Motocom
BEFORE USING COM101
Prior to first push-button use:
Read and familiarize yourself with all instructions, components and control buttons of your COM 101 Base & Remote prior to first use.
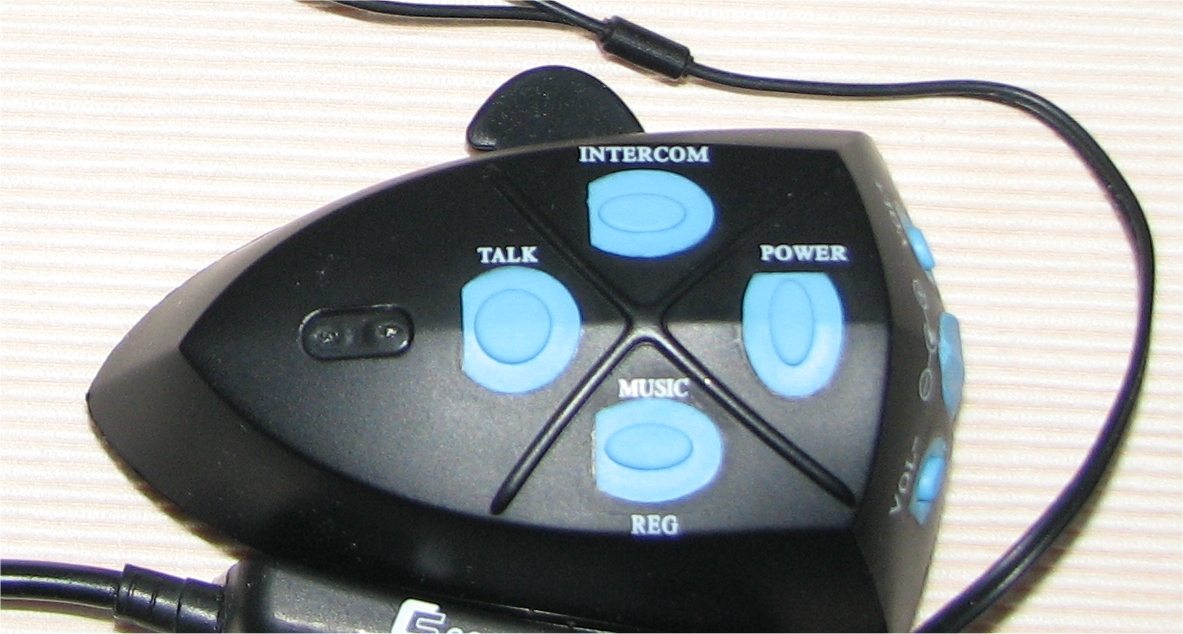
COM101 B button functions
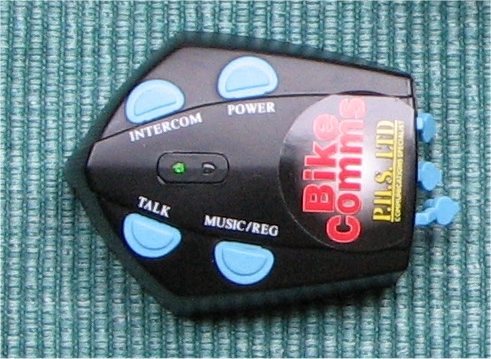
Control
module
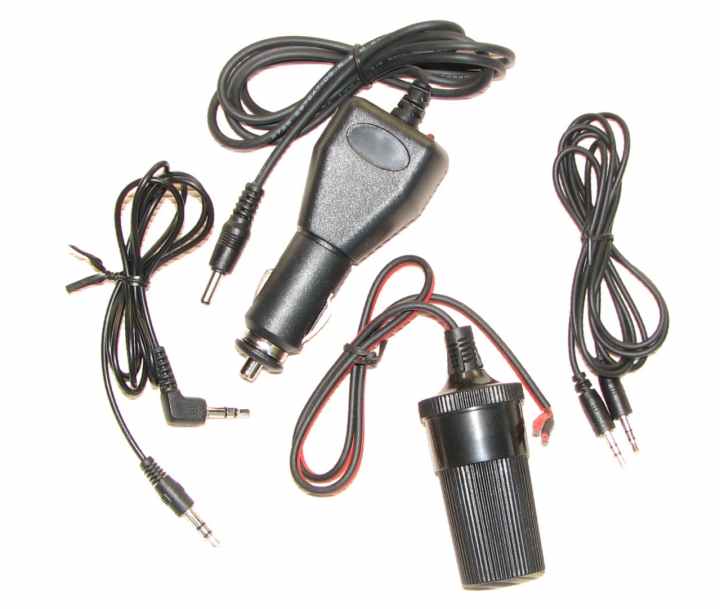
Accessory cables , cigarette lighter socket red positive ,black
negative
1. Talk button: Press to connect with cellular phone and talk
2. Intercom button: Press to talk and listen to the passenger in duplex
3. Music/Registration button: Press to listen to music or press and hold for pairing with remote unit .
4. Power button: Press to turn unit ON and OFF.
5. Cellular Phone port: Use cable to connect with cellular phone
(on back end of unit )
6. Charging port: To charge the unit or to connect with 12v DC converter
( on back end of unit )
7. Audio In port: To connect with audio device.
(on back end of unit )
COM101H button functions
Headset unit
headset unit with optional "talk time" charger plugged in
Power LED indicator: Indicates power mode
Talk button: Press to connect with cellular phone and talk
Intercom button: Press to communicate with passenger
Power button: Press to turn unit ON and OFF.
Music/Registration button:
Press to listen to music. Press and hold for pairing
Press "Vol -" to decrease volume.
Charging port: To charge the unit
Press "Vol +" to increase volume. (These last
three functions are on the rear of the unit )
Charging the units B & H
IMPORTANT: Make sure the headset is fully charged prior to initial use.
Allow at least four (4) hours for a full charge before using for the first time. Normally 5 -6 hours will suffice for a complete charge. The headset and base unit should be removed from the helmet when charging (solely for purpose of convenience).
Plug the AC/DC adaptor into the charging port for Base unit and Headset and connect plug to an electrical outlet, (red LED)
When charging is complete (Green LED stays on), release the headset from the charger.
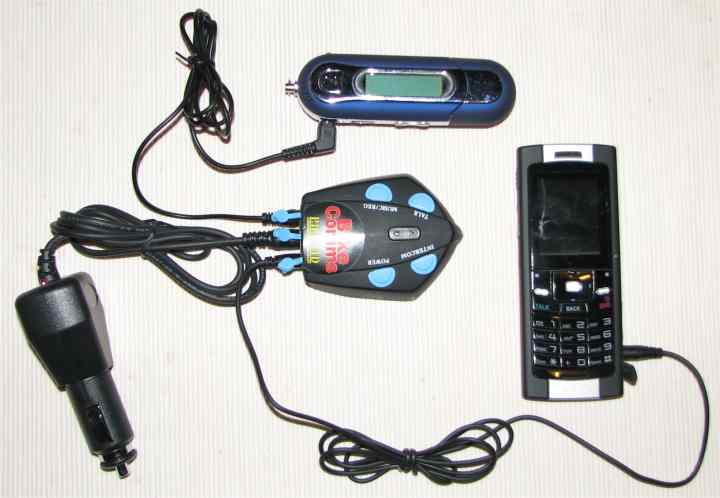
Base unit with cell phone , MP3 player , and 12 v cigarette
lighter power dropper
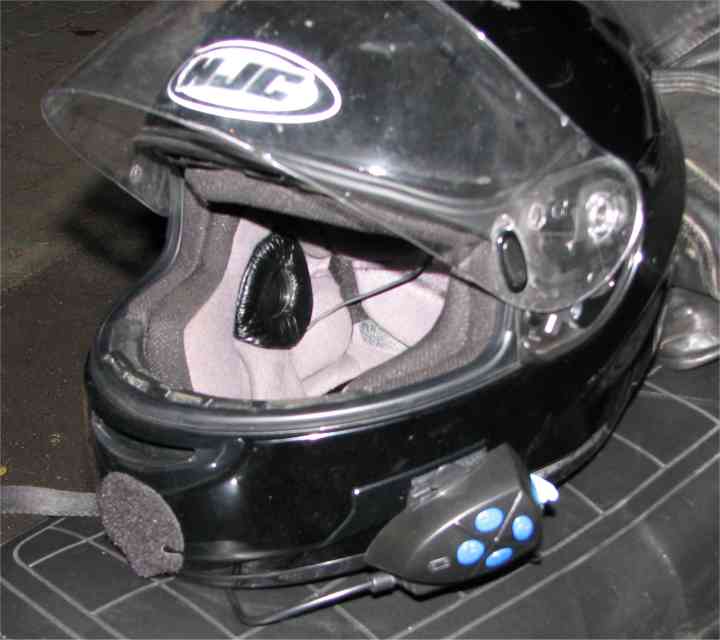
INSTALLATION & PAIRING
Remote COM101 H Installation
Once the headset and base unit are fully charged you should pair them. When this is done
(see
pairinq section) proceed to attach the unit to your helmet as follows:
� The Clamp serves as the base for the headset and must be attached to your helmet before using the headset.
Use the enclosed Alien Wrench to loosen the two screws of the Clamp. Then slide the Back-Plate of the Clamp between the internal padding and the external shell of the helmet.
Before fastening the screws, make sure to adjust the Clamp's location to an ideal position, i e to the spot where the attached speaker is opposite your ear and the microphone is located slightly off the corner of your mouth. You may need to re-position the Clamp several times until you identify the ideal spot. The speaker can be easily placed in position and removed by means of the Velcro strip that attaches to the inner padding of
your helmet. . , . ..�
Once you have identified the ideal position for the microphone and speaker, use the Alien
Wrench to fasten the Clamp.
Now slide the headset downwards along the sliding-panel of the Clamp until a light clicking sound indicates that the headset has reached its proper operational position.
You may find it somewhat easier to use Velcro to hold the
headset unit to the helmet . !
Bend the boom mic up behind the chin bar so it is very close to your mouth ,pull
off the foam cover and look and make sure you are speaking directly into
the front of the microphone, not the back of it (where the little screw
is) twist it so it is correct (speak into the large number of
holes! )>
Turn on the headset by pressing the Power button until the LED lights up.
WirelessMotocom
Base unit COM101 B installation
Attach the base unit to your motorcycle's handle bar: or velcro it
to the tank infront of you.
Use the enclosed Alien Wrench to loosen the two screws of the Clamp, place the Clamp on the handle bar.
Before fastening the screws, make sure to adjust the Clamp's location to an ideal position
Once you have identified the ideal position, use the Alien Wrench to fasten the Clamp.
Now slide the base unit downloads along the sliding-panel of the Clamp until a light clicking sound indicates that the base unit has reached its proper operational position.
Turn on the base unit by pressing the Power button until the LED lights up.
Note: In the pack, we provide a battery cable 12v DC for permanent installation; the wire must be plugged directly through the small cigarette
lighter voltage converter. socket ,,,,,, Red wire to
Positive on 13.8 v motorcycle battery and black to negative of the
battery
Removing the Remote unit from the helmet
The Clamp usually stays attached to the helmet, but you can also easily remove it by proceeding in reverse order. Press your finger firmly against the arched tip of the sliding-panel and use the other hand to slide the headset upwards along the sliding panel.
Removing the base unit from the handle bar
The Clamp usually stays attached to the handle bar, but you can also easily remove it by proceeding in reverse order. Press your finger firmly against the arched tip of the sliding-panel and use the other hand to slide the headset upwards along the sliding panel.
GETTING STARTED WITH THE COM101
Before you can use your COM 101 the first time, the pairing process between your base unit and
headset must be completed.
Pairing the unit Base & Remote driver use
the Alternative technique
below
Turn on the base unit and headset. The Green LED on the base unit and the headset will flash.
Press and hold the Music button on Base unit and headset, when the Green LED stays on without blinking, release the button, then press the music button on the headset again to confirm and then the base unit's music button to confirm registration. The pairing process is complete The Green LED remains lit without blinking.
Pairing the units with Remote Passenger
If you have purchased a COM101 H for passenger: make sure the Base unit, the headset remote for the driver and the headset for the passenger all have their Green LED flashing (in registration mode).
1. Press and hold base unit music button and COM101 H driver's music button at the same time. Release the button until the Green LED remains lit and steady.
2. Then press and hold the music button COM101 H for passenger, release the button until Green LED remains lit and steady.
3. Confirm the registration by pushing the music button again on COM101 H for passenger.
Alternatively Make sure all thee units have winking lights .
Press all three "music" buttons simultaneously and release when all green
lights are on continuously ( should take a couple of seconds ) ,
then press all again simultaneously and release. they should give a little
quick blink , Check to see if the
intercom works . if it does sucess! if not try the above
procedure again.
Pairing problems :
If you try and try and you cannot get the intercom to work,
yet music comes out of both headsets ! however you notice one
headset buttons dont appear to work like the other headsets one do
then you have to "re identify" that headset. You will have
to slide a switch in one of the headsets units one headset must be
"different" from the other , using a long this instrument
via the rubber sealed hole in the back of the headset , see pictures
below . This makes the headsets "identify" differently so the base
units realises there are two different headsets not two the same !
: Once the units are paired, the user can turn off the unit and turn it back on without
having to do the paring again.
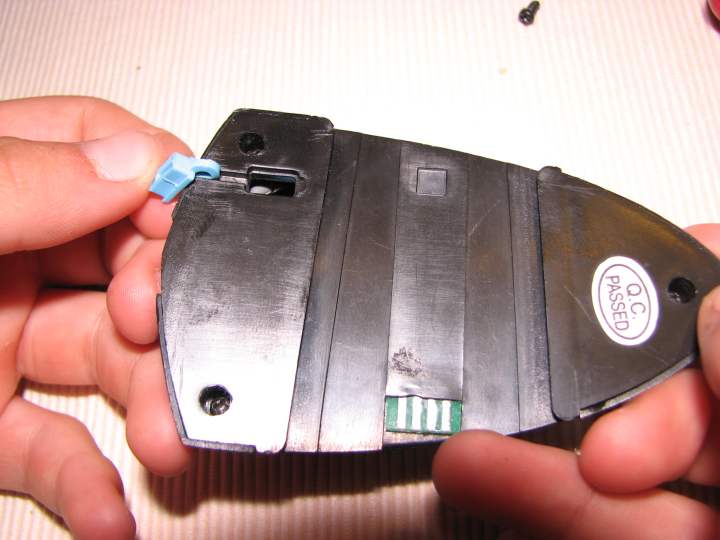
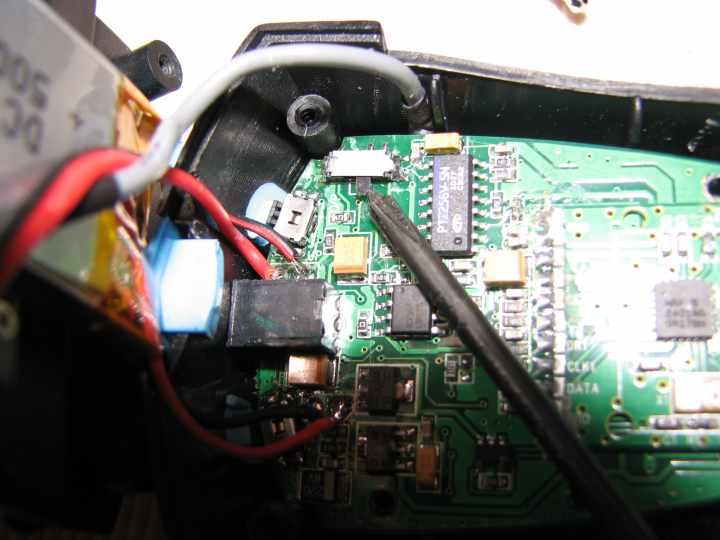
Access port to Pairing
indentity
switch
the switch you can see by peering down the access hole
7. HANDLING CALLS /MUSIC /INTERCOM
Noted: Certain advanced features of the COM 101 are only accessible to phones equipped with
the hands-free profile ( no Bluetooth is required, however).
Connect the jacks on a base unit
Use the 2.5 mm cellular phone cable to connect the cellular phone to the Base unit. (Note: use the right cellular phone adaptor for your specific cellular phone type.)
Use the 3.5 mm audio cable to connect with the music device and the base unit.
Initiating calls by using your phone's keypad
Press the Talk button on either the base unit or the headset to enter the Mobile phone mode
Dial the phone number on your phone's keypad
Press "Talk" or "Send" on your phone to dial the number
Answering Calls
The ring tone for incoming calls starts. When you hear the ring tone there are three ways you can answer the call:
Tap the Talk Button on the base unit
Or Tap the Talk button on the headset
Do not use Mobile phone Talk button to pick up the incoming call.
For safety purposes, the driver should use the talk button on the base unit on the left hand branch of the handlebar.
-Terminating Calls *
To terminate a call, tap the Talk button on the Base unit or headset. OR you may have to press "End" on your cellular phone.
Listen to music
Turn on the music device
Press the Music button on either the Base unit or the headset
Intercom
Press the Intercom button to communicate between the Driver and the Passenger
Three way calling
If you purchase the COM101H for passenger, you can enjoy three way calling. To have passenger join the phone conversation, simply press the Intercom button to have passenger join in the conversation.
Examples:
1. Rider talks on cell phone.
2. Rider communicates with passenger.
3. Rider talks on cell phone while passenger listens to music. This allows communication privacy.
4. Rider listen to music
5. Rider & Passenger listen to music
6. Rider & Passenger together communicate by telephone with a caller
7. NB: Both rider and passenger units function up to 20 feet from the base unit (on a Motorcycle)
The Internal Batteries will last 4-5 Hrs of constant use before
having to recharge , this is a typical operating life of most small
wireless intercoms ( bluetooth etc ) like this . To extend the
operating time of the headsets for over 24 Hrs , use the external 6 v AA
cell pack and plug it into the charging socket on the headset and place
the battery pack in your top pocket . the Unit will coninually charge and run
off the 6 V pack....
Radar detectors I
have not tried this but I suggest you plug the radar detector into
the phone port as Im sure the phone port will interupt the intercom
and/or the music . if you use the music port for the radar
detector it will NOT interupt the intercom/music function if
it goes off !!
Road safety , The important bit :
Always obey all Traffic Regulations in force. While riding the motorcycle, your hands should
always be on the handlebars. Any operation of the device by the driver must be made using the
base unit COM101 B .
Any adjustment of the unit, cable, jacks, remote, or others devices must be made
when the vehicle is completely stopped.
Set your cell phone on automatic answer (see your cell phone instructions as to how to do this).
If your cell phone is not equipped with this function, stop your vehicle in a safe area,
before answering the call.
Set your audio device correctly before departure . Stop your vehicle in a safe place
before making any necessary adjustment .
Adjust the volume so that it does not cause a disturbance or distraction while riding and at the
same time allows you to clearly hear background noise. (the police siren behind
you when your speeding !! )
Do not handle the cell phone, iPod or other device connected to the unit while riding.
In all cases, obey Traffic Regulations and remember that riding your motorcycle
safely has absolute
priority over any other maneuver!
Switching on the system in safe environments
When using the WirelessMotocom device COM101 series system, comply with all limitations
and instructions relating to the use of this equipment .
Turn off the unit while refueling. Do not use the device system in filling stations.
Do not use the device near combustible materials or chemical products.
Turn the unit off when in proximity to explosive materials. (That could be
exciting !!)
all sold sorry but left information in for websurfers
Want to go back to Motorcycle communications? ...... click here!
Contact:
Pinfold Health Services Ltd., 1172 Arawa St. ,Rotorua , New Zealand ph +64-7-3488850 fax +64-7-3486555 pinfold@xtra.co.nz